Backtest fill assumptions: gaps, TP and SL on the same bar, spread
A backtest result depends not only on the trading rule but on the fill assumptions: what price each order is assumed to fill at. The five to check are the TP and SL fill price, gaps, a bar that touches both TP and SL, spread and fees, and which bar the entry happens on. Fixing a single assumption can move the same strategy's result by several percent.
Fixing my fill model moved results by up to 4%
While building Hawk Backtester I found four fill bugs in my own engine.
- TP and SL hits were detected with the bar's high and low, but filled at the bar's close
- The spread was applied in the wrong direction, so every trade earned a little instead of paying
- The last bar the strategy saw and the bar it filled on were two bars apart
- Limit and stop orders filled at the close instead of their price
After fixing them I re-ran the same synthetic data with the same parameters. Of 16 combinations, 9 got worse and 7 got better, by up to about 4%.
| Market | Strategy | Before | After |
|---|---|---|---|
| Trend | High/low breakout | +14.46% | +10.20% |
| Trend | Bollinger breakout | +1.83% | +6.10% |
| Trend | RSI mean reversion | −8.14% | −4.08% |
| Range | MA cross | −2.36% | −6.14% |
| Mixed | MA cross | −0.43% | −2.79% |
Synthetic hourly data, 1,500 bars, TP 1%, SL 0.5%, spread 0.01. Selected rows.
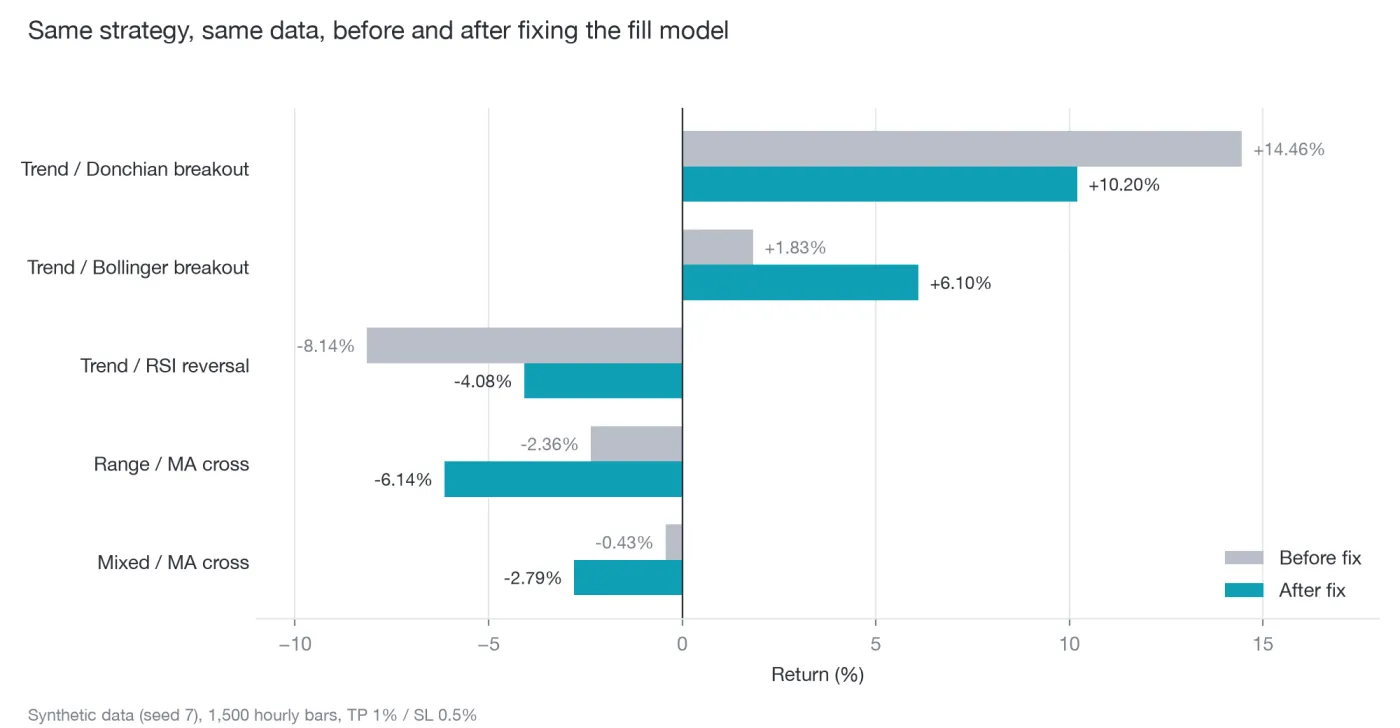
The worst part was that the ranking between strategies changed. If you choose strategies or parameters on top of a wrong fill model, the reason you chose them is gone.
Fill TP and SL at their level
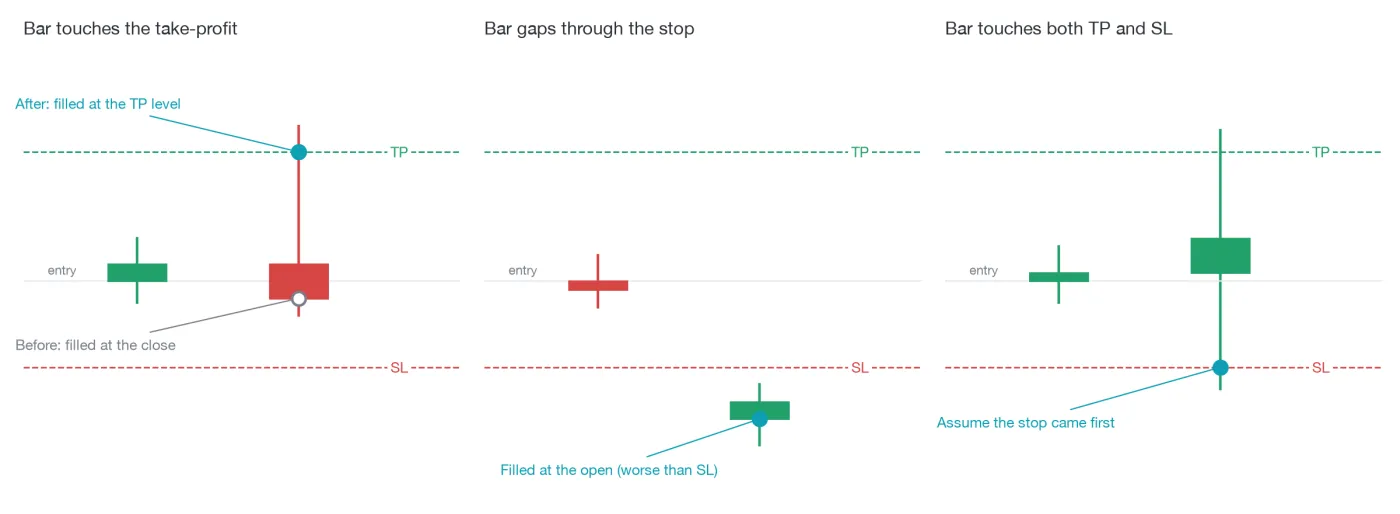
Most backtests step through OHLC bars and check the bar's high and low to see whether TP or SL was reached. If the fill price is then the close, you get trades that "took profit" and still lost money.
The baseline is to fill TP and SL at their price level. The exception is a gap.
When the market gaps through your stop
Say a bar opens far from the previous close, already beyond your stop. In reality you could not have been filled at the stop price. You would have been filled somewhere near the open.
A backtest that fills at the stop level here understates the loss. Filling at the open when the bar gapped through the level is the more realistic assumption.
When one bar touches both TP and SL
On a wide bar the high can reach your TP and the low your SL. Bar data alone cannot tell you which came first.
There are three common choices:
- Assume the stop came first (conservative)
- Assume the take profit came first (optimistic)
- Look at lower-timeframe data, such as 1-minute bars, to find the order
Assuming TP first biases results upward. Without lower-timeframe data, assuming the stop first is the safer default, and it is what Hawk Backtester does.
If this choice changes a strategy's result a lot, its TP and SL are probably too tight relative to the typical bar range.
Spread, fees and slippage
Costs apply on entry and on exit. If they are charged on only one side, or in the wrong direction, strategies that trade often look better than they are.
| Item | What to check |
|---|---|
| Spread | Buys fill higher and sells lower. A round trip costs one full spread. |
| Fees | Charged on both entry and exit. Percentage of notional, fixed per fill, or both. |
| Slippage | Applied to TP, SL and stop orders too, not only market orders. |
For high-frequency rules, compare a run with zero costs against one with slightly pessimistic costs. A strategy that turns negative when costs go up a little has very little edge left to trade.
Signal-bar close or next-bar open?
Generating a signal from a bar's close and filling at that same close is rarely possible in practice. By the time the close is final, that price is usually gone.
Filling at the next bar's open is closer to reality. It sounds like a small detail, but for breakout rules that try to catch the start of a move, it changes results noticeably. Run both and see how far apart they are.
Also check that the last bar the strategy sees is the bar it fills on. Peeking at a future bar makes results look better than they are, and lagging behind makes them worse. Bug number three above was the lagging kind.
Checklist for your own backtests
- What price do TP and SL fill at, and what happens on a gap?
- When one bar touches both TP and SL, which one goes first?
- Are spread and fees charged as costs on both entry and exit?
- Is the last bar the strategy sees the same bar it fills on?
- Do limit and stop orders fill at their price?
The quickest way to verify is a tiny price series where you can work out every fill by hand. "Long with a take profit 1 above entry, next bar's high crosses it" should fill exactly at the TP level and make units × 1.
Every Hawk Backtester fill rule is written down in the simulation model spec. Once the assumptions are settled, MFE and MAE help you read what went wrong in the losing trades.
FAQ
Do I need tick data for an accurate backtest?
Bar data is fine for comparing strategies as long as the assumptions are explicit and lean conservative. Consider lower-timeframe checks only when many trades touch TP and SL on the same bar.
How much slippage should I assume?
It depends on the instrument, the time of day and the order size, so there is no single answer. Estimate it from real fills if you have them. Otherwise run a few values and see how sensitive the result is.